
Hi chicks! This is Aurora.
Aunque estamos en agosto y la mayoría estáis aún de vacaciones, para mi es el mes de los cumpleaños. Los cumpleaños de mis hijos, de mi abuela, de mi ahijado y de los niños de algunas de mis mejores amigas. Así que para el tutorial de hoy os voy a enseñar como he pintado los globos de este precioso sello de Time for Tea Designs, muy versátil para tarjetas de cumpleaños de niños y mayores.
Although it's August and most of you are still on holiday, this is for me a month of birthdays. Both my kids' birthday, my grandma's, my godson and the children of some of my best friends. Therefore for today's tutorial I'm going to show you how have I coloured the balloons in this beautiful stamp from Time for Tea Designs, very suitable for kids and grown ups.
Although it's August and most of you are still on holiday, this is for me a month of birthdays. Both my kids' birthday, my grandma's, my godson and the children of some of my best friends. Therefore for today's tutorial I'm going to show you how have I coloured the balloons in this beautiful stamp from Time for Tea Designs, very suitable for kids and grown ups.

Si antes de empezara pintar pensamos en un globo hinchado, veremos que el color es
más intenso en el contorno y más claro hasta hacerse casi transparente en el centro.
If before starting colouring, we think of an inflated balloon, we'll see that the colour is more intense in the
edge and turns paler until becoming almost transparent in the centre.
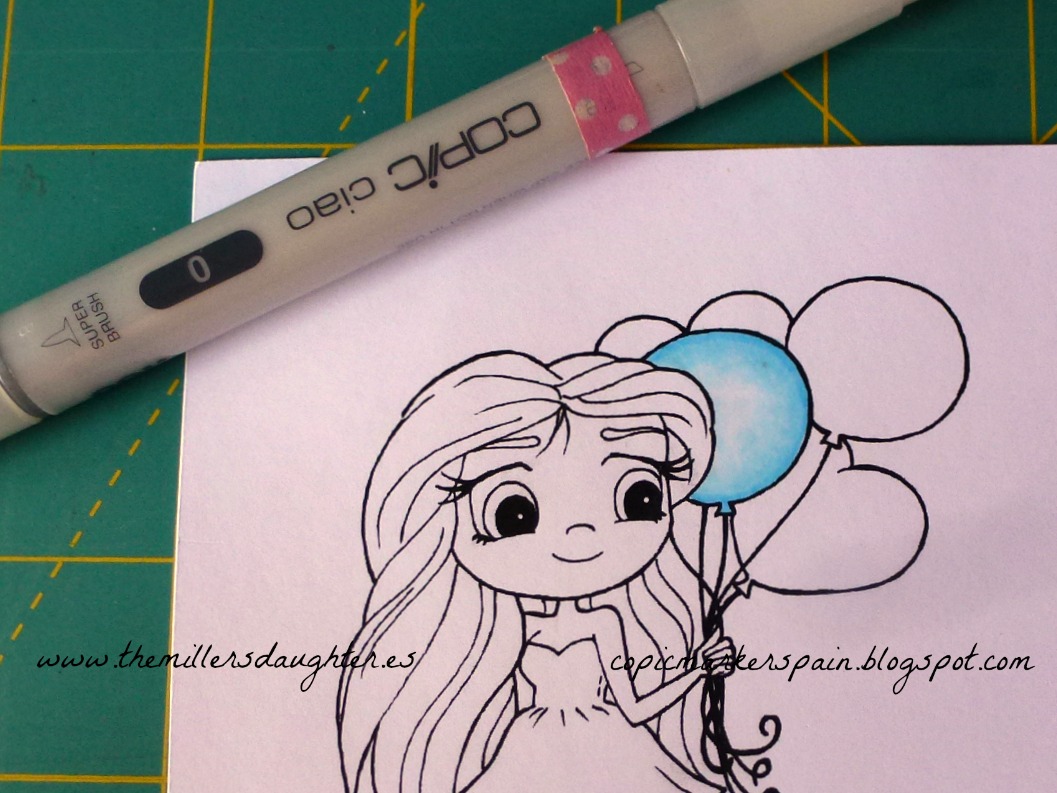
Por eso, para pintar los globos he utilizado un tono más fuerte y dos más claritos de la misma gama.
En el caso del azul he utilizado B02, B00 y B000.
En el caso del azul he utilizado B02, B00 y B000.
For this reason, to colour the balloons I used a dark shade a two clearer ones from the same colour.
For the blue balloon I used B02, B00 and B000.

He empezado pintando el contorno del globo con el tono más oscuro (B02) y a continuación
con el siguiente tono (B00) he expandido ese contorno intentando degradar bien los limites.
I started colouring the balloon edge with my darker shade (B02) and then with the following
shade (B00) I extended that edge blending the colours as well as possible.

A continuación, he ido coloreando desde el borde hacia el centro con el color más claro (B000)
dejando el centro sin pintar. Una vez más, intento degradar el límite del tono interior.
Next, I coloured from the edge to the middle with my clearer shade (B000), leaving the centre uncoloured. Once again, I try to smoothly blend my shades.
dejando el centro sin pintar. Una vez más, intento degradar el límite del tono interior.
Next, I coloured from the edge to the middle with my clearer shade (B000), leaving the centre uncoloured. Once again, I try to smoothly blend my shades.

Finalmente, con el blender (0) he degradado el borde del color más claro. Podríamos decir que se trata de
un degradado a blanco. De esta manera conseguimos un centro blanco que da un efecto de transparencia.
Finally with my colourless blender (0) I tried to blend in my clearer shade. Could be said that it fades to white.
This way I achieved a white centre which gives it a transparency effect.
Repetimos el proceso con el siguiente globo.
En este caso, he utilizado V15, V12 y V000.
I repeated the process with the following balloon.
In this case I used V15, V12 and V000.

Si volvemos a pensar en globos reales, nos daremos cuenta de que normalmente podemos ver
los contornos de los objetos que están detrás de ellos, en este caso otros globos.
Por eso, aunque estos globos se solapan muy poquito, he pintado con mi color más claro (V000) la parte del globo
violeta que está detrás del globo azul. De este modo incremento el efecto de transparencia.
If, again, we think about real balloons, we'll realise that normally we can see the shapes
of the objects that are behind them, in this case other balloons.
To achieve this effect, I coloured the with my clearer shade (V000) the part of the balloon
that was behind the blue one. This way I increased the transparency effect.

De nuevo he repetido el proceso con el resto de los globos.
Uno en color rojo. R22, R20 y R00. Podéis ver el contorno del globo rojo por detrás del azul.
El otro en amarillo. Y08, Y02 y Y00.
Again, I repeated the process with the rest of the balloons.
One red. R22, R20 y R00. You can see the shape of the red balloon behind the blue one.
The other yellow. Y08, Y02 y Y00.
Y ahora, os voy a explicar lo que dicen todos los tutoriales para colorear globos que he encontrado en la red.
Now, I'm going to explain to you what they do in all the tutorials that I could find on the net.

En primer lugar se rellena todo el globo con el blender (0), y a continuación se colorea el contorno
del globo con los colores más oscuros, igual que en el el caso anterior.
First, they fill the whole balloon with the colourless blender (0), and then they colour the edges
of the balloon with the darker shades, like in the previous case.

Seguidamente, se colorea el interior del globo con el color más clarito.
Then, they colour the rest with the clearest shade.
Finalmente, se aplica el blender en el centro del globo para crear un efecto de transparencia.
Finally, they dab the blender on the centre of the balloon to create the transparency effect.
A continuación podéis ver la misma imagen coloreada con ambas técnicas. Arriba he dejando el centro en blanco y he difuminando con el blender. Abajo, he coloreado totalmente el globo y he utilizando el blender para crear un efecto de transparencia.
Under this lines, you can see the same image coloured with both techniques. Above, I left the centre uncoloured and faded to white with the blender. Below, I completely coloured the balloons and then used the blender to create the transparency effect.

Personalmente me quedo con la primera, pero os recomiendo que las probéis para elegir la que más os guste.
Personally, I prefer the first, but I recommend you to try them both to choose which one you prefer.

Detalles de la imagen completamente coloreada/ Colouring details:
- Piel/Skin: E000, E00, E11, E21
- Pelo/Hair: E50, E53, E55, E57
- Blusa y Zapatos/Top and Shoes: R000, R20, R22, R24
- Falda/Skirt: B93, B95, B97
- Globos/Baloons: B000, B00, B02, V000, V12, V15, R00, R20, R22, Y00, Y02, Y08
- Ojos/Eyes: B000, B00, B02
- Calcetines/Socks: C1, C3, B000
Espero que os haya gustado y no olvideis que aun estaís a tiempo de participar en nuestro reto mensual, con el tema Verano o Vacaciones.
Hope you liked this and don't forget that you can still play our monthly challenge with the theme Summer or Holiday
Muchas gracias por la explicacion esta genial, habra que probarlas....
ResponderEliminarHi Aurora, a fabulous tutorial, great colouring and love the image.
ResponderEliminarHugs Erin x
Muchas gracias Aurora muy interesante lo probare.
ResponderEliminar